So, recently, I started trying to figure out my next project. Got frustrated. Went to another idea yesterday—and it came out cute! I feel better. Will tackle the other, shortly. Lol
…………………………………………………………………………
Thank you!!
First, I want to, again, thank everybody who has been so supportive!
Aline in Jacksonville, FL, wrote: “I absolutely love your blog ❤ ❤ ”
To which I replied: “Aw…thanks so much!! You have NO IDEA what a blessing that is to me. 🙂 Share DIY B around! I surely would appreciate it! I love all y’all who say such encouraging things to me ’bout my blog! Y’all r th best!!!”
Aline added: “Aww, well I personally thank you for creating it! I absolutely love all things bohemian ❤ ❤ —”
Me, too, Aline!
…………………………………………………………………………
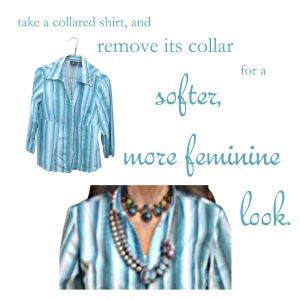
I made a cute boho top with a detached collar from three tops: two long-sleeved plaid flannel shirts (I call ’em “plannels. ” 🙂 ) and a sleeveless top I wasn’t wearing. I’m very pleased with the end result!
P.S. I call it an “apple pie tunic” because my husband Jerry said he liked it; that it was very “apple-pie-ish” —In other words, it’s homespun-country looking. 🙂
Here’s the tut …Let’s go!
Find three tops that coordinate color-wise.
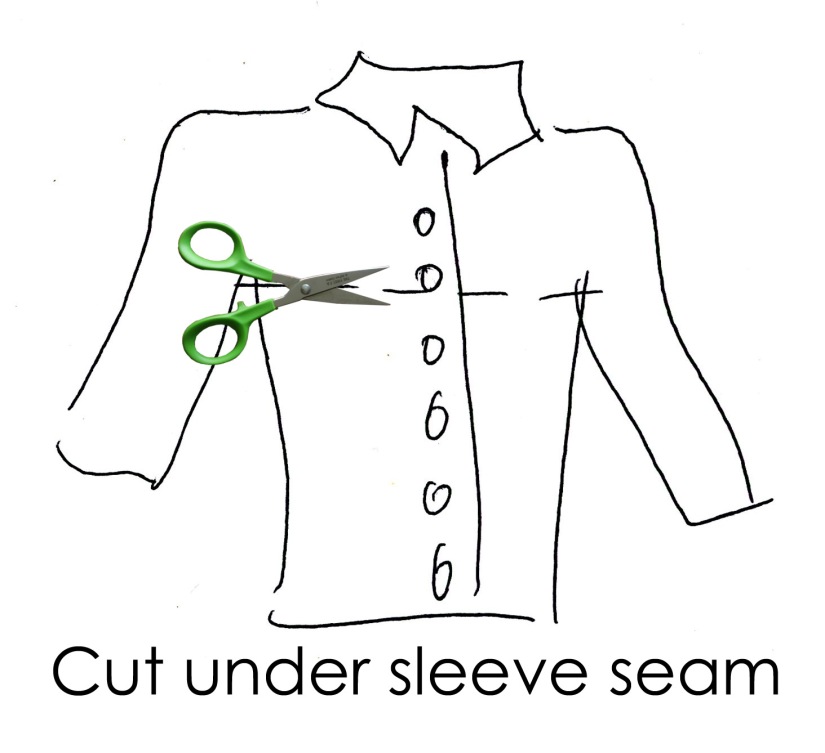
Take the sleeves from one.
Take the bodice from another.
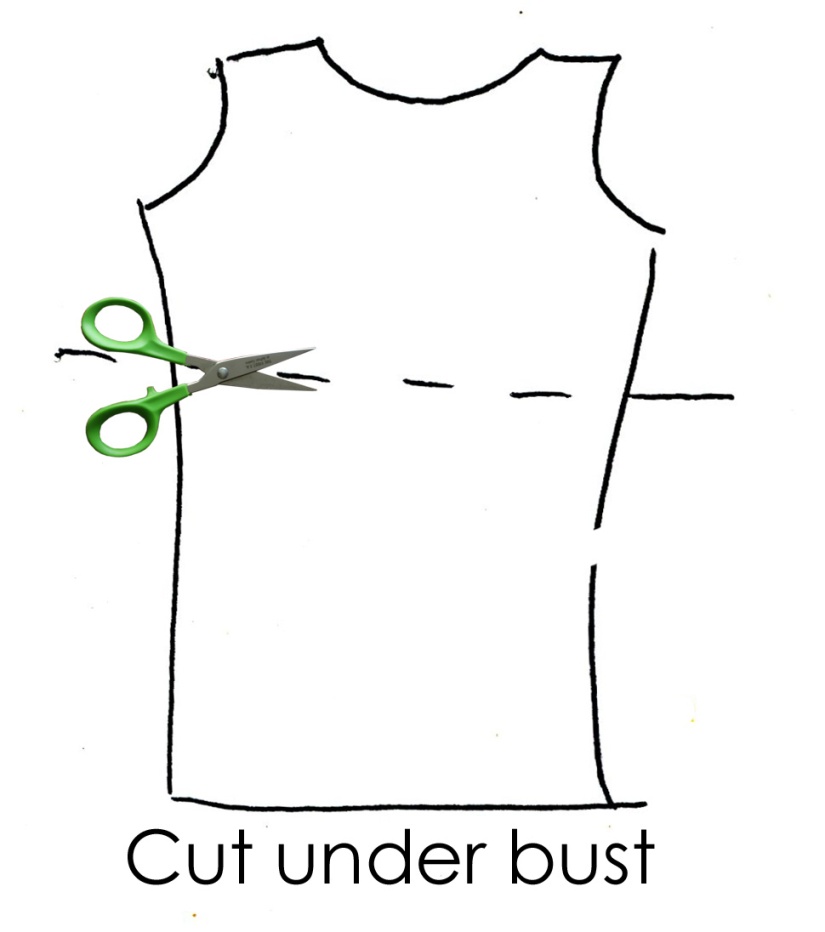
Take the bottom from a third shirt.
Take the collar from one.
Tips:
After you cut off the sleeves from Shirt A, make sure you put the right sleeve on the right armhole, and the left on the left—on your new bodice. I got mine on backwards. The buttoned cuffs face the wrong way …but, hey! it’s probably gonna stay that way! Lol! Start with lining up the seams under the arm, with the right sides of the fabric together, and pinning around. At the top of the sleeve (shoulder area), because my sleeve was bigger than the armhole, I took a tuck at the top, and pinned. Or, while you’re sewing, sew up the sides of the armhole first, leaving the top of the sleeve for last, and you can gather it across the top with several tiny tucks, as you sew.
“Plannel” Shirt B was a larger size, so when I sewed it to the bottom of the bodice, it needed to be gathered a little …but, I like it that way! Face the right sides of the fabric together. Be sure to line up the side seams and, also, be sure the button-down is centered on the front. Pin those areas securely; start out sewing there, removing the pins as you go, and, as you sew, make little tucks to gather in between.
The detached collar is self explanatory. Just be sure you cut below the stitch line on the base of the collar, as in the above pic.
All you readers and followers of DIY Bohemian are just too much! (But, don’t stop! Lol.) I’ve heard from Egypt, Italy, South Africa, the island of Cyprus, and Canada! …plus the States, of course. 🙂
Y’all are sosupportive! I luvvitt !!! ❤ I thank God for each and every one of you! You are truly a blessing to me. XXXOOO
Mercia in South Africa was so kind as to say, “Thanx for sharing beautiful things with us💜💜💜⚘”
Rose in New Mexico remarked about my DIY Bohemian Facebook page: “My scarf collection is fabulously out of control, and this is an awesome page!” She has also liked/ loved my posts and is now my FB friend. Luvya Rose!
…Daphne in Illinois declared, “Very fun!! Looking forward to seeing more of what you do!” She also pointed out to readers, “If you have some basic sewing skills and a good imagination….you can totally do this! Just dig in and try! I have been making Upcycled clothing for years! Love It!!!”
I value your comments, and so appreciate your shares, likes and loves.
……………………………………………………..
Well… now that it’s nearing the end of October, “winter” has arrived in central Florida!
This is our first cold front this season, swooping down from the north. It was 60 degrees this morning… brrr…! Lol! Yeh, I know! But, when the temps drop 10-15 degrees in a 24-hour period, this Florida girl shivers! 😀 I would never make it in cold country!
This tutorial is really simple, but perhaps you haven’t thought of it.
One day, I was looking through my hats and couldn’t find one that really went with my outfit. And, I thought, hmmm… a headband would be cute…
I looked through my two bags of belts in my closet and found a narrow, braided leather one. Well, I couldn’t use it that day, but made a project of it later…
Decide on your belt.
Since my belt was braided, brown leather, and I would have to cut off the ends (the braided part went only mostly around my head), I thought shoestrings would be the ticket for this. I got round shoestrings. They were long, so, I cut them to the length I wanted: 12 inches—long enough, once attached to the braid, to tie behind my head. I put some glue (E6000 permanent bond cement glue) on the fraying ends and twisted the ends with my fingers to make the ends hold. (The glue easily rubs off your skin while it’s still moist. If it dries on your hands, don’t worry: It eventually comes off. I’ve handled this glue many times.)
Next: Because I didn’t want to chance my braid coming undone… before I cut the ends off the belt, I dotted some glue on the back of the belt to hold the braid in place. After it dried, I cut off the unwanted ends.
Insert the end of a shoestring piece through the front of the braid near the end of the braid and tie a half knot over the end of the braid. The tail of the shoestring will be on the back. Use needle and brown thread to make several stitches to hold the knot and secure the tail. You may want to dot a little glue just to hold the knot in place. Same, on the other end.
I’m so excited to report: So far this month—and the month is only just over half gone— compared to last month—all that month, DIY Bohemian has quintupled in its number of hits!! 😀 , that is, five times more people are viewing this site!!
Gals have been liking and sharing my links posted on Facebook, and making favorable comments, too! 😀
THANK YOU!
THANK YOU!
THANK YOU!!!!
…………………………………………………………………………..
I’ve had comments from some gals saying they hadn’t really imagined that they could actually make their own Bohemian clothes! …that they are a little intimidated by a sewing machine.
Fear not, ladies!!
I’m no great shakes of a seamstress, either!
That’s the cool part about refashioning! 🙂
My tuts are not demonstrating how to actually produce a garment from scratch… I show you, step-by-step—-with pictures! my ideas of making a few, simple (usually) changes or combining different pieces of clothes, so you end up with original togs.
…………………………………………………….
What I really would LOVE to see, is: that y’all would create something on your ownand share it with me!
One beautiful lady named Rose, in New Mexico, said she has had lots of creative ideas but just hadn’t carried them out—yet! I encouraged her to please! follow her heart and her dreams.
A Mediterranean beauty, named Theano, from the island of Cyprus, is pressing through an illness by originating her own blog: selling handmade—by the locals— boho jewelry and accessories.
I love these girls! They have shared a little of their lives with me and I just love them! 🙂
Theano liked my Bohemian bag tut so much, that she was so kind as to ask to re-post it on her blog! Visit her site, TheaXessorize. Catch the link at the bottom of my post. 🙂
For now, read on…
…………………………………………………….
Our mothers, grandmothers, and greats were all wonderful seamstresses—taught by their mothers before them. Back in “the day,” that was a woman’s life: cooking and sewing. My, how times have changed!
Now, women are catching the thrift wave! Here in the States, our thrift stores are glutted with clothing. Years ago, people cast off to thrift stores only those old worn-out clothes that were really not fit to wear anymore.
But, now, a smart thrifter may find cool boho rags, though they are scarce, in excellent condition. The thing is, to realize the potential in something. When I go to a bin thrift, I look for—yes, clothes made in India ❤ , or by East Indians, but also bits of anything I can use: trims, lace, pieces of upholstery fabric, tulle in a little girl’s skirt—anything unusual and interesting to me…always in colors that will go with my hair and skin.
…………………………………………………….
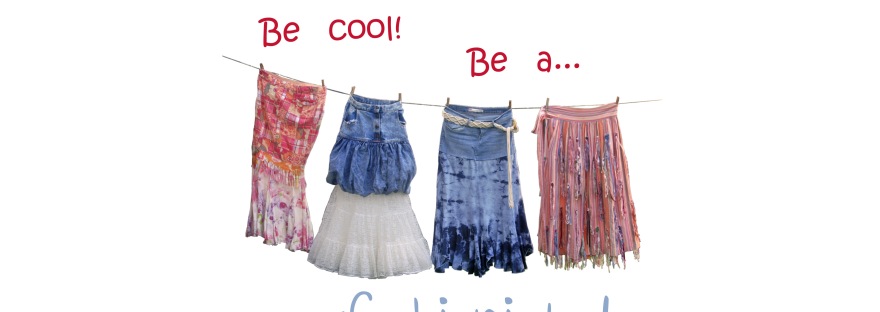
Here are a few ideas of refashioning:
Left: This figure-enhancing skirt is made from a pair of shorts with a skirt sewn onto the bottom, trimmed with pieces from a knit top. The corresponding top (shown on the tut) is made of two different tops, combined. See the tut for this two-piece dress here.
Second from left: I found this great denim balloon skirt, and attached a vintage crinoline (petticoat) to the bottom. To make it a two-piece dress, add a fitted denim vest (right)!
Second from right: This cute, hippie maxi is made from a pair of denim shorts with a (used-to-be) white cotton skirt sewn to the bottom, which I tie-dyed (before it was attached to the shorts).
Right: My ribbon skirt is an oldie but a goodie! 🙂 I did this a while back. After finding this multicolored vertically-striped skirt, she spoke to me that she wanted matching ribbons and lace, attached to her with colorful buttons. Her streamers dance in the wind when she moves.
All of us live in two worlds: the real world and the dream world. Well, actually, it’s, at least, three: the spiritual world, the physical world, and our dream world. We are, in fact, spiritual beings housed in a physical body, having a human experience and interacting with our tangible surroundings.
Your dream world, and mine, seems to overlap in both the spiritual and physical realms. Each of us is designed in the image of our Creator, with the desire and ability to create, to be inventive, to have imagination.
Anyone who has daydreamed and come up with an idea knows that dreaming is a valuable element of life.
None of us must ever suppress that longing to create—it was put in us for a purpose!
A big goal for me in writing this blog is to stir your creative juices. Simply put: If nothing more, imagination and the resulting creativity make life more fun!
…………………………………………………………………………..
“Bohemian” conjures up fantasy, romance, the free-spirited life.
It gives us mortals an opportunity to psychologically escape into a dream world—even partially or temporarily.
I think most of us truly want to possess good character: to be responsible, accountable, dependable, conscientious, reliable folk that others can look to for excellence and integrity. Yet, we crave a release from the dull routine of life.
Enter DIY Bohemian! 😀
Create your own style!Put some fantasy in your norm!!
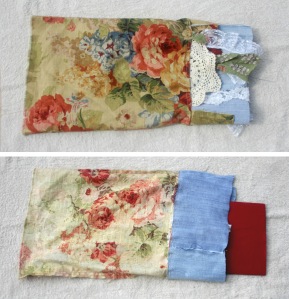
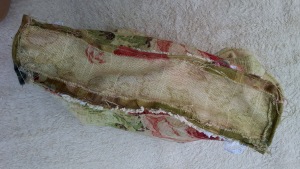
(I used two matching covers. I found four of the same fabric at the Goodwill Outlet where items are sold by the pound.)
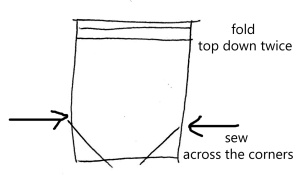
I wanted the end result of the bag to be 12 inches wide and 15 inches long, not counting the fringe on the bottom.
Cut the upholstery fabric to size, allowing 1/2-inch side and bottom seams. For the top of the bag, allow an inch for the seam, so you can fold it over twice to hide the raw edge of cloth. So, you need two 13×16-1/2-inch pieces.
Face the right sides together, making sure to have both with the top up, and sew the two pieces together ONLY down the sides, making 1/2-inch seams.
With it still wrong side out, on the top of the bag-in-the-making, fold down—toward you—a 1/2 inch of material all the way around the bag, pinning on the right side of the material. Then fold it again another 1/2 inch, causing the raw edge of cloth to be on the inside of the fold. Sew the top seam.
If your fabric has blue in it, as mine does, gather pieces of denim of a 6-inch length, but DO NOT cut or tear them into fringe—yet!
Also, cut rectangles of the floral upholstery fabric—shorter than the denim, and pieces of lace, strips of colored cloth that go with the print, etc.
The total width of the fringe-to-be should be 24 inches to go all around—front and back—of the 12-inch-wide bag. You can put pieces together—it doesn’t have to be one long strip of fabric, ‘cuz when you tear the fringe, it will all be in strips anyway.
When you’re placing the doily halves, fix them in what will be the center on each of front and back of the bag: You can fold the layered strip, then visually center the doilies, and open it back up to sew onto the open-ended “tube” of pillow cover.
Pin it all together. Make sure you have only one line of pins. In other words, when you pin one thing and layer something else over it, remove the pin and put it on the top again, pinning through all layers with that one pin. Otherwise, when you’re sewing, you won’t be able to find the pins and you risk breaking your needle or sewing pins inside where you can’t get them back out.
This shows the bag right side out and wrong side out with the fringe-to-be already sewn on. I used a (red) notebook to separate the front and back to pin the fringe to the bag.
6. Turn the bag-to-be inside out, having the wrong side out. Pin your fringe strip to the bottom edge, all the way around, making sure the end meets the starting point. Then, sew down your fringe-to-be to the bottom edge of the bag-to-be. Leave it open on the bottom because you’ll be putting in a bottom. But if you don’t want to put in a bottom (to make it roomier), you can sew it closed.
After you sew the fringe-to-be onto the pillow cover, it is still an open-ended tube, at this point.
7. Now, for the bottom:
Cut a long rectangle of floral fabric from the upholstery cloth of a pillow cover. I made mine 3 inches wide: It was what was remaining after I cut for the body of my bag from a 16×16-inch pillow cover. The finished bottom ended up being 2 1/2 inches wide. As for the length? I thought it wise not to cut, but to sew it on first, then cut. Glad I did, ‘cuz I needed longer than what I thought I needed.
8. With the fabric of the bottom piece lying wrong side up, fold up a 1/2-inch in from the edges all around. Either press all four folds with a warm iron to make a crease, or pin it down.
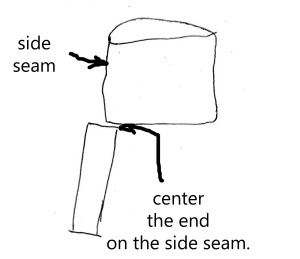
9. First—with the bag inside out, line up the side seam on the body of the bag with the center of the end of the rectangular bottom (left), and pinch them together and pin. As the bag is wrong side out, the rectangular bottom piece is also wrong side out, with the folded edges showing.
10. Now, continue to pinch and pin, following the right-angled corner of the bottom piece, continuing all along around the entire bag, going around each corner, pinning the bottom to the body of the bag. When you’re nearly all the way around, trim off the excess of the rectangle of fabric where needed and finish pinning.
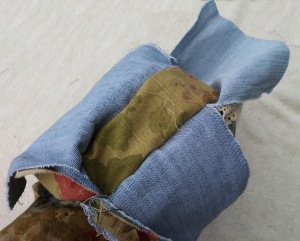
This, on the left, is how it looks inside out. What will become the fringe is not visible because it is inside. This, on the right, is how the completed bottom will look right side out. The blue pieces are what will become the fringe.
11. Making the flap:
I used the corner of one of the pillow covers because the floral print fit nicely with the print on the front of the bag. Or, you can cut out two triangles and sew them back to back. Cut off the top corners according to how it fits the top of the bag. Hem the flat sides.
Sew a zig-zag stitch across the top to hold the two layers together, then turn over the edge 1/2 an inch on the side you want to show. It seems you should turn it over on the back of the flap, but you don’t. Pin the fold from the back. Then, flip over the flap and fit it inside the hem of the top of the bag. Pin and sew.
12. The strap:
I used a woven belt with compatible colors. I wanted to reinforce where the strap would attach, so I cut out a double-thick swatch of denim and sewed it down on the inside where the strap would be connected on the outside. When sewing the reinforcing swatch and putting on the strap, sew several times back-n-forth, zig-zagging, or X-ing across to make it hold better.
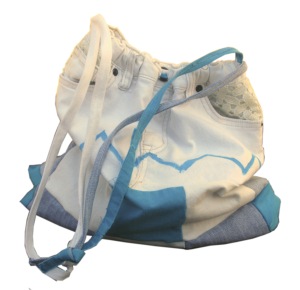
13. The liner:
I used a floral shower curtain I got at Goodwill Outlet. The width of the liner will be the same as the width of the bag, adding 1/2-inch on each side for seams, or cut one piece and fold with a seam on only one side. (I did this.) Be sure the right side of the fabric is inside, and the seams are on the outside—the wrong side of the fabric—because you want the pretty side to be inside for the liner.
Make it some longer than the length of the bag, allowing an inch at the top for the seam that will be folded over twice to keep the raw edge inside the seam. Also, you need it longer because you will sew across the bottom corners to make it fill out the roomier bag, instead of it being a flat liner bag. See right.
14. Stuff the liner in the bag with the top of the liner covering the denim reinforcements. I hand sewed the liner at the top of the bag because it seemed too difficult to use the machine here.
15. Tear or cut the fringe: At the bottom all of the fabric squares sewn to the bottom of your bag, cut a small slit, at intervals—about 1/2 inch wide, and tear upward. Repeat, until the all the squares are torn or cut into fringe.
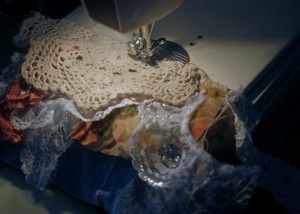
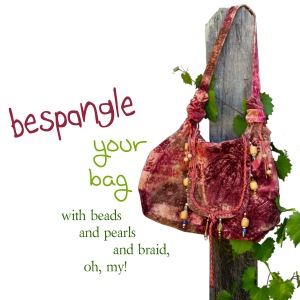
16. Add decorations:
Add a doily across the top (left).
Use costume jewelry, beads, more fringe. I sewed on a pin (that had lost its back) to the tip of the flap.
The belt I used has metal loops on the end, so I attached swatches of fabric, then cut/ tore fringe (right), braided some, added beads, added an earing on the bottom of the braid. 🙂 So, I have dangles on the side of the bag.
Hi there! Can you believe summer is now officially over?!
We just celebrated the Autumn Equinox 2017 in the Northern Hemisphere, which was at 4:02 PM on Friday, September 22, Eastern Time. (I have to specify, now that DIY Bohemian is going global!! 😀 (I’ve joined some Bohemian Facebook groups that have members around the world! Awesome!)
O’course, the beginning of fall in Florida is not so different from our summers! However, I have noticed that our highs have been in the low 90s in the last few weeks, as opposed to the high 90s during the hottest days of summer! Lol!
And, at times, I can feel “it” in the air.
…………………………………………………………….
One of the first signs of fall in Florida is the blooming of the Golden Raintrees. Their bright yellow blooms are followed by pinkish seed pods—a second color show for these trees.
The “fall colors” in Florida are, mostly, yellow and purple. (Note: Yes, we actually have some trees that change color from green to orange and red, such as the sweetgum!)
…………………………………………………………….
Over the last few months we’ve created some fun stuff!
But, before I give you a really simple way to get a cool Boho skirt, I want to give credit where credit is due!!
……………………………………………………………………….
It has been called “the worst hurricane in recorded history.”
Hot House, Cold Showers
Living through a hurricane
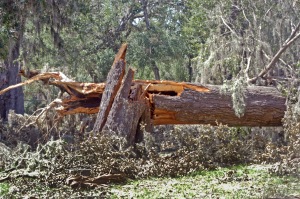
As Hurricane Irma approached Florida earlier this month of September, 2017, it was classified as a colossal Category 5 monster cyclone, raking across the Caribbean and the Florida keys with destruction and, sadly, death. But, when it continued its path northward and passed just a few miles west of us in Apopka, it had diminished to a Cat. 1.
Some areas within a ten-mile radius of us received much loss of huge trees: some uprooted from the ground, some broken; some twisted off from the powerful rotating winds of tornadoes, born within the storm. Some fell on cars and houses.
This large tree fell in a cemetery just a block from our house. Other toppled trees in the same area near us obstructed streets.
Just a block away from us, trees were knocked down. But, for us, only a few small branches were blown down and our yard was littered with thousands of leafy twigs from the buffeting and churning of treetops. I heard reports that our area got 55 to 75 mile-per-hour winds.
For us, the aftermath was worse than the actual event:
No power for seven days!
No a/c. No fans.
No COMPUTER!!
No toast, no milk on my cereal. Food going bad in the fridge. Couldn’t cook…no, wait: is that a negative or a positive? Lol. I finally had to throw out all our refrigerated food…but, we had an ice cream feast the first night!!
Dying cell phones with no way to charge them.
Only candle light at night, which could’ve been romantic ambiance if it weren’t so hot!
Couldn’t watch movies…Just sittin’ on the couch in the dark, fanning ourselves.
Couldn’t do laundry. No hot showers. Too hot to sleep.
Continuous monotonous droning of the neighbor’s generator…
But, wait a minute…these are inconveniences, not hardships.
Hardship is this: suffering and distress among the people living in the Caribbean, those with property in the keys, those still going through hell in Texas from Hurricane Harvey, those trying to survive the earthquakes in Mexico—with the heartbreak of death and destruction all around them.
What we went through is NOTHING compared to these others!
My husband Jerry and I belong to Jesus Christ. Before the storm hit, we, along with millions, were praying that it would veer to the east and go out into the Atlantic. When it didn’t, I prayed it would take the least-damaging route, affecting the least number of people, with lessening conditions.
For us and our house, we prayed for God’s hand to cover us, that His angels would hold in place our house, trees and fence. We anointed our four walls with oil, a biblical practice, as an invitation to the Holy Spirit of God, committing our house to Him and asking for protection.
We were spared.
……………………………………………………………………….
I have no explanation as to why people and property experienced such devastation. I have no answers.
But, as a witness testifies in a court of law as to what he/she saw and experienced personally, I can only attest to the fact that we asked God for protection and He granted it to us. We are truly, truly grateful!!
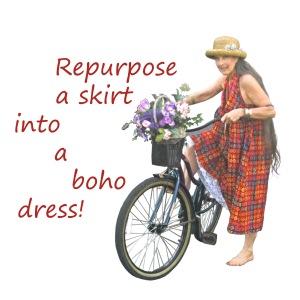
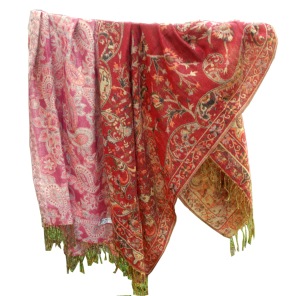
I was blessed to have been given two beautiful scarves, which are very large. In considering what I might do with them, I came up with this uncomplicated way to use them in making a skirt!
They are related in print but different shades of color, but compatible.
Measure from your waist to the length you would like the skirt to fall. Even though I measured, mine is still a little long. No problem: I just gather it a little at my waist.
Lay them out on a table, with the wrong side up, overlapped, so that the total length is what you measured for the length of your skirt.
Pin it all the way across.
Hold it carefully, ‘cuz the pins are likely to come out in transit to your machine.
Sew a straight line where you pinned, pulling out the pins as you sew.
Fold the combined scarves and pin about a 12-inch seam up the outer edge from the bottom. This step is optional: It depends on how much leg you want to show. I preferred to have the skirt closed on the bottom.
Also optional: I sewed a short gather into the bottom of the top scarf near the top of my leg, simply to draw it up a bit for an uneven swag…just for decoration purposes.
Now, step into it. Gather in your hands the top corners and tie a knot snuggly against your waist.
Sometimes it’s just the smallest details that can really make a big impact!
I had this fringe, sewed onto a ribbon, already made from another project, but didn’t use it, so it was just sitting on my sewing table.
I kept looking at it, thinking, “I could use that on something!”
Finally, I laid it on a purple tank top…BINGO! And I absolutely love the color combo!
So, this is a really easy thing you can do to spiff up a plain tank. I’ve always liked the combo of purple with certain shades of green. I looked through my skirts, and this one is great to wear with it.
Simple additions/ adjustments/ different pairing of clothing pieces can ENLARGE your wardrobewithout buying anything new!!
I wore my “new outfit” —only with cowboy boots this time, when I got together with my friend of 30-something years, recently. We were walking into a movie theater when a woman walked up from behind us and asked where we were going, so dressed up. My friend Vicki said, She always dresses up!
I noticed the woman’s funky-print pants. As we talked, I offered her one of my DIY Bohemian cards. YEA! another card “out there.” 😀 She told me she liked my look. YEA!
Later, as we were waiting for a seat at a restaurant, Vicki met one of her friends she hadn’t seen in years. The friend was with her husband and another couple. While Vicki talked with her old friend, the other woman told me how much she liked my look. So, I gave her a card, too! Yippee!


 I made a cute boho top with a detached collar from three tops: two long-sleeved plaid flannel shirts (I call ’em “plannels. ” 🙂 ) and a sleeveless top I wasn’t wearing. I’m very pleased with the end result!
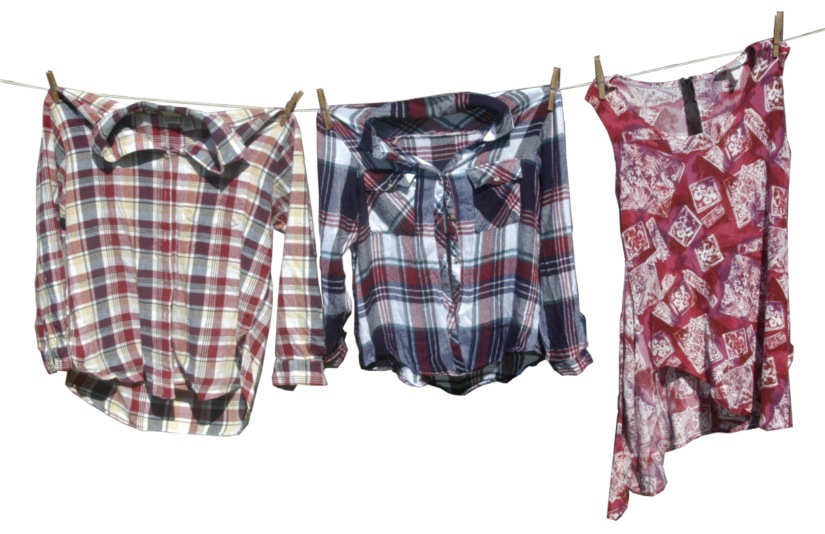


 Well… now that it’s nearing the end of October, “winter” has arrived in central Florida!


 That’s it!


 Hey! all you Bohemians out there…

 Second from left: I found this great denim balloon skirt, and attached a vintage crinoline (petticoat) to the bottom. To make it a two-piece dress, add a fitted denim vest (right)!


 Your dream world, and mine, seems to overlap in both the spiritual and physical realms. Each of us is designed in the image of our Creator, with the desire and ability to create, to be inventive, to have imagination.
 “Bohemian” conjures up fantasy, romance, the free-spirited life.
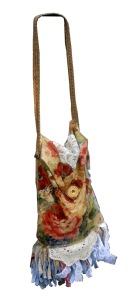 My bohemian bag is fanciful and romantic.


 9. First—with the bag inside out, line up the side seam on the body of the bag with the center of the end of the rectangular bottom (left), and pinch them together and pin. As the bag is wrong side out, the rectangular bottom piece is also wrong side out, with the folded edges showing.
 10. Now, continue to pinch and pin, following the right-angled corner of the bottom piece, continuing all along around the entire bag, going around each corner, pinning the bottom to the body of the bag. When you’re nearly all the way around, trim off the excess of the rectangle of fabric where needed and finish pinning.
 This, on the left, is how it looks inside out. What will become the fringe is not visible because it is inside. This, on the right, is how the completed bottom will look right side out. The blue pieces are what will become the fringe.
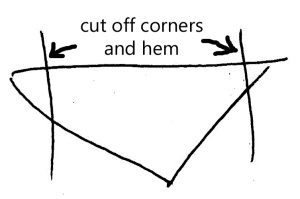 I used the corner of one of the pillow covers because the floral print fit nicely with the print on the front of the bag. Or, you can cut out two triangles and sew them back to back. Cut off the top corners according to how it fits the top of the bag. Hem the flat sides.

 Make it some longer than the length of the bag, allowing an inch at the top for the seam that will be folded over twice to keep the raw edge inside the seam. Also, you need it longer because you will sew across the bottom corners to make it fill out the roomier bag, instead of it being a flat liner bag. See right.
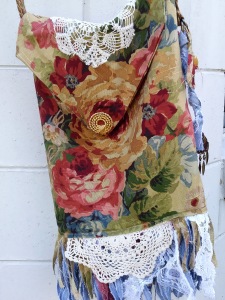 Add a doily across the top (left).
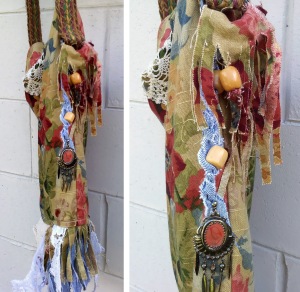 The belt I used has metal loops on the end, so I attached swatches of fabric, then cut/ tore fringe (right), braided some, added beads, added an earing on the bottom of the braid. 🙂 So, I have dangles on the side of the bag.
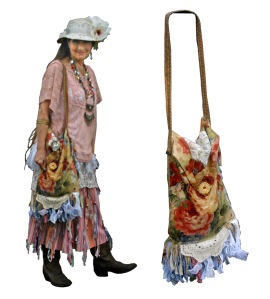


 One of the first signs of fall in Florida is the blooming of the Golden Raintrees. Their bright yellow blooms are followed by pinkish seed pods—a second color show for these trees.


 I was blessed to have been given two beautiful scarves, which are very large. In considering what I might do with them, I came up with this uncomplicated way to use them in making a skirt!
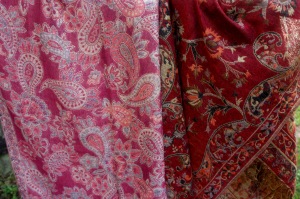 They are related in print but different shades of color, but compatible.
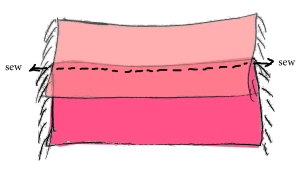 Lay them out on a table, with the wrong side up, overlapped, so that the total length is what you measured for the length of your skirt.
 Sew a straight line where you pinned, pulling out the pins as you sew.
 Now, step into it. Gather in your hands the top corners and tie a knot snuggly against your waist.


 So, this is a really easy thing you can do to spiff up a plain tank. I’ve always liked the combo of purple with certain shades of green. I looked through my skirts, and this one is great to wear with it.
 I wore my “new outfit” —only with cowboy boots this time, when I got together with my friend of 30-something years, recently. We were walking into a movie theater when a woman walked up from behind us and asked where we were going, so dressed up. My friend Vicki said, She always dresses up!